The previous example was a use case that sent a GET request to Twitter’s API. GET requests are very common when reading from an API and the $.ajax method will default to this type when none is specified. In our next example, we will create our own RESTful API that allows our users to send POST requests. Let’s create an API so users can register for prizes. Our user interface will consist of a simple form that only requires an email address (see Figure 9–3 and its related code in Listing 9–4).

Figure 9–3. Registration form for client-side POST with Ajax
Listing 9–4. Registration form for client-side POST with Ajax (ch9/register-client.html)<div data-role="page" id="registrationPage" data-theme="d">
<div data-role="header">
<h1>Registration</h1>
</div>
<div data-role="content">
<form id="register" method="post">
<label for="email">Email:</label>
<input type="email" name="email" id="email" placeholder="Email"
required />
<input type="submit" id="submit" value="Register" />
</form>
</div>
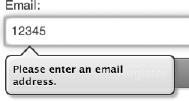
</div>TIP: The input field for the email address includes three newer HTML5 attributes. The type=”email” field provides two benefits. First, when the field receives focus it will prompt the QWERTY keyboard with several useful email keys (see Figure 9–3). Secondly, it will also verify that the field contains a valid email address when the form is submitted. For instance, in the newer desktop browsers, if a user enters an invalid email they will be prompted with the following message:
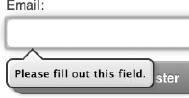
Additionally, the required attribute will assert the email field is not empty when the user submits. If it is empty, the user will get this warning:
Lastly, the placeholder attribute will add hint text to the input field. While these features are helpful, not all of them are supported in today’s browsers. Peter-Paul Koch has a useful site9 that shows all available input attributes with their associated browser support.
To handle the form submission on the client-side we will attach an event listener on the submit button. To submit a POST request to our RESTful API, the following steps are necessary (see Listing 9–5):
__________
9 See http://www.quirksmode.org/html5/inputs_mobile.html andhttp://www.quirksmode.org/html5/inputs.html
- First, we need to intercept and override the default submit behavior. Now we are ready to submit the form through our RESTful API:
$("form").submit(function () { - Secondly, we need to display the jQuery Mobile activity indicator so the user is visually aware that an activity is being processed in the background:
$.mobile.showPageLoadingMsg() - Next, we set up our
$.ajaxrequest with all required options:- Our
urloption is configured to our new RESTful resource that was set up locally to handle the client-side registration:url:"http://localhost:8080/jqm-webapp/rest/register"We will look at the RESTful implementation in a moment. - Next, we set the
typeoption to POST. POST is the recommend type when creating new entities and it is slightly more secure than GET because it does not expose the data attributes as query string parameters on the URL:type: "POST“ - Again we set the
dataTypeoption tojsonpbecause our RESTful API is also running on a separate domain from our client:dataType:“jsonp“ - The
jsonpoption defines the callback function that will handle the response:jsonp: "jsoncallback"Any RESTful resource that handlesjsonprequests must produce a JavaScript response. The response is actually JSON data wrapped within a JavaScript function. For instance, the response of our RESTful API will include the email address that was successfully registered, wrapped in a callback function. The name of this callback function needs to be set as the value of ourjsonpoption:jsoncallback({"email":"[email protected]"}) - The
dataoption contains the data we want to send to our RESTful resource. In this case, we will send all form values and URL-encode them with jQuery’sserializemethod:data: $("form#register").serialize(), - The last option is our
successhandler. This will get processed after we receive a successful response from the RESTful API. In our case, we forward the user to a thank you page and also pass the successfully registered email address as a data parameter for confirmation:success: function( response ) {$.mobile.changePage( “register-
thanks.html”, {
data: {"email": response.email}} );
}
- Our
Listing 9–5. Client-side POST with Ajax (ch9/register.js)$(“#registrationPage”).live("pageinit", function(){
  $("form").submit(function () {
    $.mobile.showPageLoadingMsg();

    $.ajax({
        url: "http://localhost:8080/jqm-webapp/rest/register",
        type: "POST",
        dataType: "jsonp",
        jsonp: "jsoncallback",
        data: $("form#register").serialize(),
        success: function( response ) {
           $.mobile.changePage( “register-thanks.html”,
                { data: {"email": response.email}} );
        }

        return false; // Prevent a form submit
    });
});
After a successful registration, users will be forwarded to a thank you page where we show them what they have won along with the email address where the prize was sent (see Figure 9–4 and its related code in Listing 9–6).
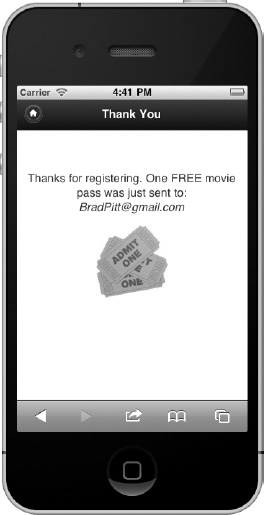
Figure 9–4. Thank you page after client-side POST with Ajax
Listing 9–6. Thank you page after client-side POST with Ajax (ch9/register-thanks.html)<div data-role="page" id="thanksPage" data-theme="d">
  <div data-role="header">
    <a href="/ch9/register-client.html" data-icon="home"  data-iconpos="notext" data-
direction="reverse"></a>
        <h1>Thanks</h1>
  </div>

  <div data-role="content" class=”thanks”>
    <p>Thanks for registering.  One FREE movie pass was just sent to:   <span
class="email"></span></p>
    <img src="images/free-movie.jpg">
  </div>

</div>
TIP: When designing a navigation strategy for your site it is important to always provide the user some navigational option to avoid dead ends. In jQuery Mobile, a simple solution is to always show the home icon in the header bar and have it redirect back to the home page with a reverse transition:
<a href="home.html" data-icon="home" data-iconpos="notext" data-
direction="reverse"></a>
When we executed our changePage call we also passed the email address as a data attribute to the thank you page. That data attribute gets appended to the page’s data-url attribute:
data-url="/ch9/register-thanks.html?email=BradPitt%40gmail.com"
Before the thank you page is enhanced, we fetch that email address and bind it into the email placeholder on our thank you page (see Listing 9–7).
Listing 9–7. Append email onto thank you page (ch9/register.js)$("#thanksPage").live("pagebeforecreate", function(){
    var email = getParameterByName("email", $(this).jqmData("url"));
    $(".email").append(email);
});

function getParameterByName(param, url) {
    var match = RegExp('[?&]' + param + '=([^&]*)').exec(url);
    return match && decodeURIComponent(match[1].replace(/\+/g, ' '));
}
The RESTful implementation on the server-side to handle the registration was implemented with Jersey10 and deployed on Tomcat11 (see Listing 9–8).
Listing 9–8. RESTful resource to handle registration (com.bmb.jqm.resource.RegisterResourse.java)@Path("/register")
public class RegisterResource {

    @Produces("application/x-javascript")
    public Response register(@QueryParam("jsoncallback")
        @DefaultValue("jsoncallback") String callback,
        @QueryParam("email") String email) {
        Registration registration = new Registration();
        registration.setEmail(email);
        // Save registration...

        // Return registration in response as jsonp
        return Response.status(Response.Status.OK).entity(new
        JSONWithPadding(registration, callback)).build();
    }
}
__________
10 See http://jersey.java.net/.
11 See http://tomcat.apache.org/.
Let’s review Jersey’s annotations as we step through the resource:
- The
@Pathannotation defines the path the resource is responsible for handling. In this case, the RegisterResource object will handle all requests sent to “*/rest/register”. Jersey is configured in web.xml and there are two configuration items that require setup (see Listing 9–9). First, we need to define the package(s) where all Resources are deployed, and secondly we need to define what URL patterns should be dispatched through the Jersey container. We have defined that all RESTful resources are declared in package “com.bmb.jqm.resource” and we will route all URL paths with “/rest/*” through the Jersey container. - The
@Producesannotation defines the MIME type of our response. We have chosen to expose our RESTful API publicly across domains which requires the resource to return a JavaScript response. This allows clients to access the API withjsonprequests. - The register method accepts two input parameters. The first is the callback function name. The client may send the name of the callback function but it is not required. The server will default the callback name to “
jsoncallback” if none is supplied. The last parameter is the email address of the user that is registering. - The server can now process the registration and generate a response. In this example, we will return a response that contains the Registration object converted to JSON and wrapped within the callback function:
jsoncallback({"email":"[email protected]"})
Listing 9–9. Jersey configuration (web.xml)<servlet>
  <servlet-name>Jersey REST Service</servlet-name>
  <servlet-class>
    com.sun.jersey.spi.container.servlet.ServletContainer
  </servlet-class>
  <init-param>
      <param-name>com.sun.jersey.config.property.packages</param-name>
      <param-value>com.bmb.jqm.resource</param-value>
  </init-param>
  <load-on-startup>1</load-on-startup>
  </servlet>
  <servlet-mapping>
      <servlet-name>Jersey REST Service</servlet-name>
      <url-pattern>/rest/*</url-pattern>
  </servlet-mapping>
As we have seen, jQuery Mobile integrates very well with RESTful API’s. Whether we need to read or submit data, the built-in jQuery library provides all the convenient functions for managing the RESTful lifecycle on the client-side.CopycopyHighlighthighlightAdd NotenoteGet Linklink
Leave a Reply