Django provides a simple way to create the form. There are multiple ways to create the forms, but Django built-in form is strongly recommended. Because it will automate a good amount of work and provide stable and secure functionality. But the problem with the Django built-in form is that it doesn’t allow easily let us edit the form for customize design.
In this tutorial, we will see one of the popular ways to customize the Django form. We will include our custom CSS, classes, or id in the individual fields in the forms. Let’s see why we need to use the Django widget tweaks.
Problem with Django Built-in Form
Before moving towards the Django widget tweaks package, we will elaborate on a bit of the problem we face in Django built-in forms.
We create a form using the Bootstrap classes. Let’s see the code of the simple form.
<form>

  <div class="form-group">

    <label for="id_email">Email address</label>

    <input type="email" class="form-control" id="id_email" name="email">

  </div>

  <div class="form-group">

    <label for="id_password">Password</label>

    <input type="password" class="form-control" id="id_password" name="password">

  </div>

  <button type="submit" class="btn btn-default">Submit</button>

</form>
Here we have designed a simple form with some attributes, and we can add more according to our requirements. Now we will create a model in the model.py file.
from django.db import models


# Create your model here

class Profile(models.Model):

    first_name = models.CharField(max_length=30)

    last_name = models.CharField(max_length=30)

    email = models.EmailField(max_length=254)

    phone = models.CharField(max_length=20)

    bio = models.TextField(max_length=500)


    def __str__(self):

        return self.first_name
Using this model, we create a Django Form. Create a forms.py file and add the following code.
form.html
<!doctype html>

<html lang="en">

  <head>

    <!-- Required meta tags -->

    <meta charset="utf-8">

    <meta name="viewport" content="width=device-width, initial-scale=1">


    <!-- Bootstrap CSS -->

    <link href="https://cdn.jsdelivr.net/npm/[email protected]/dist/css/bootstrap.min.css" rel="stylesheet" integrity="sha384-KyZXEAg3QhqLMpG8r+8fhAXLRk2vvoC2f3B09zVXn8CA5QIVfZOJ3BCsw2P0p/We" crossorigin="anonymous">


    <title>Simple Form</title>

  </head>

  <body>

    <h1>Simple Form</h1>


<form method="post">

    {% csrf_token %}

    {{ form }}

    <div class="form-group">

      <button type="submit" class="btn btn-success">

        <span class="glyphicon glyphicon-ok"></span> Save

      </button>

      <a href="{% url 'index' %}" class="btn btn-default">Cancel</a>

    </div>

</form>


    <!-- Optional JavaScript; choose one of the two! -->


    <!-- Option 1: Bootstrap Bundle with Popper -->

    <script src="https://cdn.jsdelivr.net/npm/[email protected]/dist/js/bootstrap.bundle.min.js" integrity="sha384-U1DAWAznBHeqEIlVSCgzq+c9gqGAJn5c/t99JyeKa9xxaYpSvHU5awsuZVVFIhvj" crossorigin="anonymous"></script>


    <!-- Option 2: Separate Popper and Bootstrap JS -->

    <!--

    <script src="https://cdn.jsdelivr.net/npm/@popperjs/[email protected]/dist/umd/popper.min.js" integrity="sha384-eMNCOe7tC1doHpGoWe/6oMVemdAVTMs2xqW4mwXrXsW0L84Iytr2wi5v2QjrP/xp" crossorigin="anonymous"></script>

    <script src="https://cdn.jsdelivr.net/npm/[email protected]/dist/js/bootstrap.min.js" integrity="sha384-cn7l7gDp0eyniUwwAZgrzD06kc/tftFf19TOAs2zVinnD/C7E91j9yyk5//jjpt/" crossorigin="anonymous"></script>

    -->

  </body>

</html>
Run the server and visit http://127.0.0.1:8000/form/.

Installation of Django Tweaks
To customize the Django built-in forms, we need to use Django tweaks. We install using the following command.
pip install django-widget-tweaks Once it is installed in the system add the widget_tweaks to your INSTALLED_APPS.
# Application definition


INSTALLED_APPS = [


    'django.contrib.admin',


    'django.contrib.auth',


    'django.contrib.contenttypes',


    'django.contrib.sessions',


    'django.contrib.messages',


    'django.contrib.staticfiles',


    'MyWeatherApp',


    'widget_tweaks',


]
Usage
In this section, we will show few of many options the package offers. If you want to understand all, you can take the reference of its official documentation. The widget-tweaks app provides the two sets that can be used together or standalone.
- A render_field template tag for customizing form fields by an HTML-like syntax.
- Several template filters for customizing form field HTML attributes and CSS classes.
The render_fields are easier to use and make the field customization much easier for designers and front-end developers.
However, template filters are more powerful than the render_field tag. But they are quite complex and less HTML-like syntax.
To start working with it, we must load the following tag in the template file.
{% load widget_tweaks %} Now expand your form by iterating through its fields, in order to expose the input tags, replacing this.
{{form}} From this
- {% for hidden in form.hidden_fields %}
- {{ hidden }}
- {% endfor %}
-
- {% for field in form.visible_fields %}
- <div class="form-group">
- <label for="{{ field.id_for_label }}">{{ field.label }}</label>
- {{ field }}
- {% for error in field.errors %}
- <span class="help-block">{{ error }}</span>
- {% endfor %}
-
- </div>
- {% endfor %}
- <button type="submit" class="btn btn-success">
- <span class="glyphicon glyphicon-ok"></span> Save
- </button>
- <a href="{% url 'home' %}" class="btn btn-default">Cancel</a>
- </form>
Output:
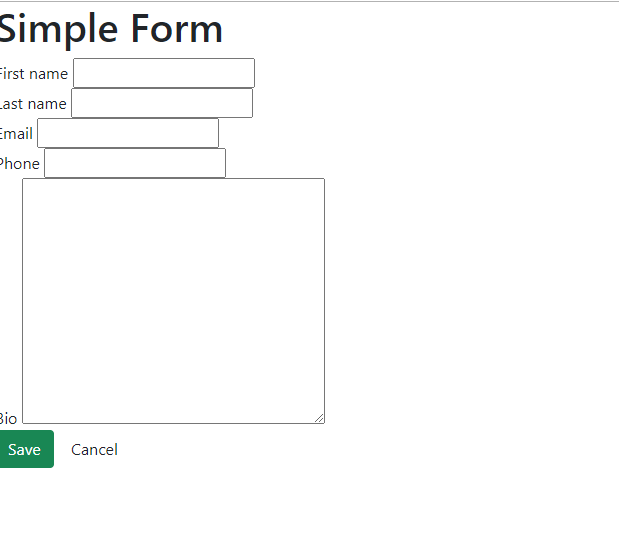
As shown in the above code, the form design has improved, but our form is not looking.
Now we use the django tweaks and add extra attributes to the field element.

We have applied the bootstrap class in each Django form field. We will have all our code in the CSS file for customizing each filed by class or id.
{% render_field form.first_name class="form-control" %} Let’s understand the following implementation of render_field.
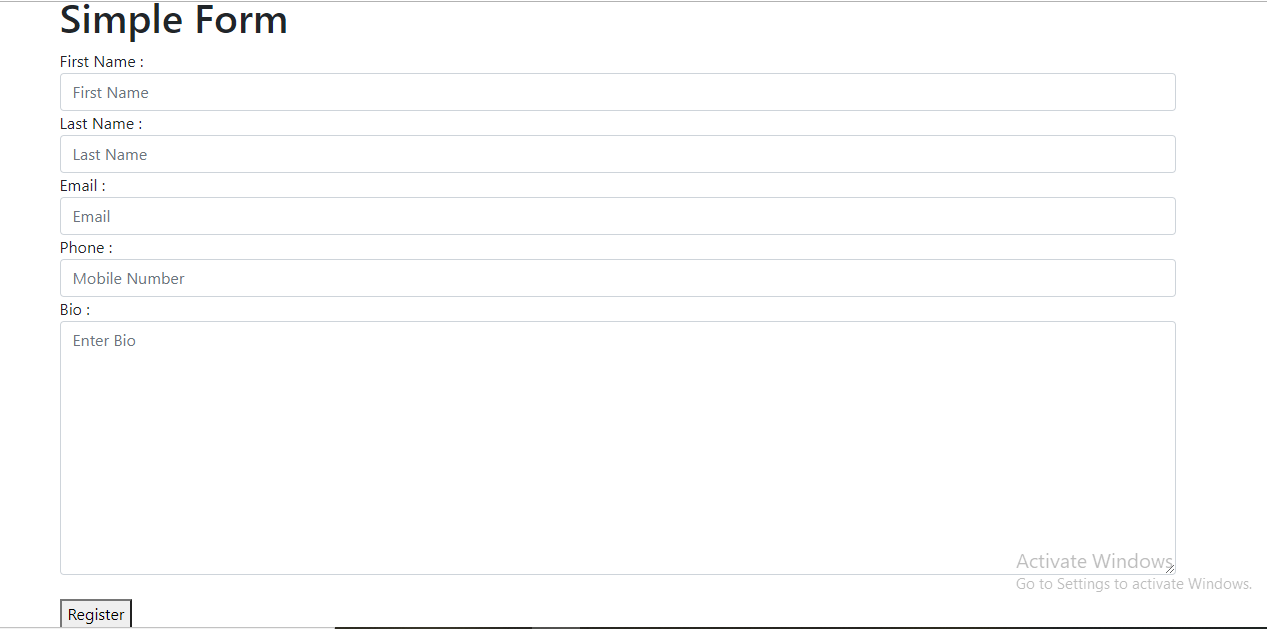
Django-tweaks package is a powerful tool to customize the form fields. It helps us to apply the bootstrap class in each field. So we have to design the HTML, with CSS, and use it in Django by just replacing the input tag with render_field and form.field_name with {%%} at the end and design it with our choice.
Leave a Reply