In this section, we are going to wrap a jQuery Mobile app with PhoneGap and run it on the native Android platform. To set up PhoneGap on the Android platform, we will reference PhoneGap’s “Getting Started Guide with Android”7. Installation of Eclipse, the IDE for Android development, is a prerequisite. After your Android platform is set up, you should have a new Eclipse project that looks similar to Figure 10–11.
_____________________________
6 See http://developer.apple.com/library/ios/#documentation/Xcode/Conceptual/ios_development_workflow/145-Distributing_Applications/distributing_applications.html.
7 See http://www.phonegap.com/start#android.
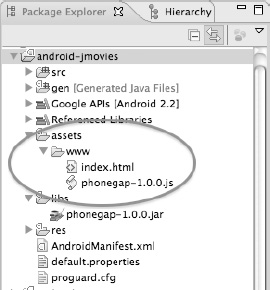
Figure 10–11. Initial Eclipse project with PhoneGap support
The “www” directory shown in Figure 10–11 is the application root directory. Within this directory are the PhoneGap JavaScript library and a default page (index.html). The index.html page will be shown as the initial landing page when we run the app. In Eclipse, to build and run the app, click the Run menu, select Run As, and choose Android Application. After we compile and run the app, the Android simulator will launch and the index page will be shown (see Figure 10–12).
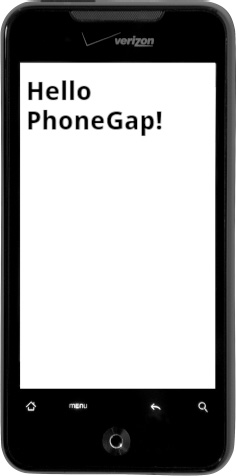
Figure 10–12. Initial screen when running PhoneGap’s default app in Eclipse
TIP: If you find it takes too long for the Android simulator to launch you may prefer to deploy to an actual device for testing. For this setup, make sure USB debugging is enabled on your device (Settings ![]() Applications
Applications ![]() Development) and plug it into your system. Now when you run your application, it will launch much quicker.
Development) and plug it into your system. Now when you run your application, it will launch much quicker.
With a PhoneGap project setup in Eclipse we can now import an existing jQuery Mobile app into our project. The steps for importing a jQuery Mobile app into our Eclipse project and deploying as a native Android app are listed below:
After importing the jQuery Mobile project into our Eclipse project we need to import PhoneGap's JavaScript library as a top-level resource:- First, we need to import an existing jQuery Mobile project into Eclipse’s “www” root directory. For this exercise, you may import your own jQuery Mobile app or import the jQuery Mobile project that is included in the chapter 10 source code folder. For example, if we import the jQuery Mobile files from the Chapter 10 source code directory and move them into our “www” directory, our Eclipse project structure should appear as shown in Figure 10–13:
 Figure 10–13. an Eclipse project
 - The last step is to run and test our application. In Eclipse, click the Run menu, select Run As, and choose Android Application. This will compile the app and launch it within the Android simulator. If you imported the jQuery Mobile project from the chapter 10 source code the initial screen to appear will be the springboard (see Figure 10–14).
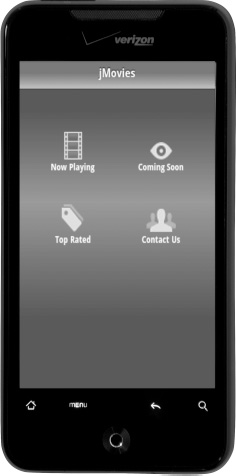
Figure 10–14. Initial screen when running PhoneGap from Eclipse
If you recall from our iOS example we globally enabled the back button to appear on all screens because back buttons are often fixed within the header of an iOS app. Since Android has a hardware based back button, it is not necessary to enable our back buttons (see Figure 10–15).
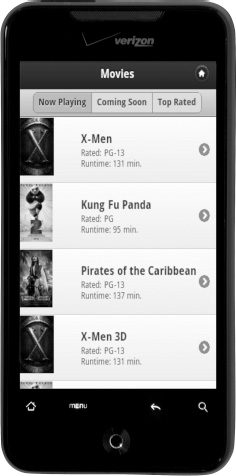
Figure 10–15. No back button necessary on Android
TIP: Extract platform specific dependencies in separate files. This separation will help simplify the management of different configurations across platforms. For instance, create a separate configuration file for each supported platform: custom-ios.js, custom-android.js. Now each platform can load their unique dependencies.
Now that we are capable of deploying our jQuery Mobile app to the native Android platform we will also want to customize the default app icon (see Figure 10–16).

Figure 10–16. PhoneGap’s default app icon in Android
The Android app icons are stored in the project’s /res/drawable-* directories with images available for high, medium, and low densities (see Figure 10–17).
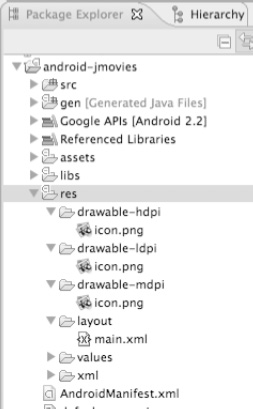
Figure 10–17. Android’s app icon images
That completes the entire process from installing PhoneGap to running our jQuery Mobile app on the native Android platform. When your app is ready for production, the final step is distributing your Android app to Android Market. The complete instructions for distributing your app to Android Market can be found in Android’s Development Guide.8CopycopyHighlighthighlightAdd NotenoteGet Linklink
Leave a Reply